
One of our worst fears we all have had is that our children could get lost, or worse, abducted. The Massachusetts Masonic Lodges in conjunction with the Massachusetts Dental Society and Massachusetts Association of Crime Prevention Officers has implemented the CHIP (Child Identification Program), and to date have taken videos, fingerprints and Toothprints® on over 200,000 children in the Commonwealth. The Massachusetts program is the most comprehensive program in the world.

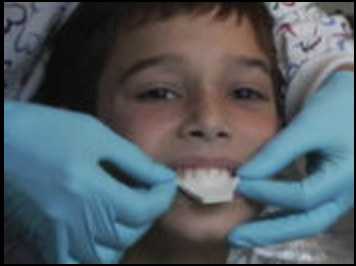
A softened thermoplastic wafer that is placed in Example of Toothprintsthe child's mouth. They are instructed to "bite tight like a lion" to make a recording of the size and shape of teeth, the position of the teeth in the jaw, and the relationships of the jaws to each other. The impression is a permanent record like fingerprints, it is unique to every individual. Even identical twins have different Toothprints©. Children should have Toothprints© at age 3-4, again at age 8-9 and finally at age 11-12, if there are no fillings or other dental identifiers. The other major advantage to the impression is (1) the saliva provides cells for DNA sample, and (2) the saliva scent on the wafer can be used for scent dogs to track lost or missing children.
Take the bite impression and place it in a zip lock bag with the child's name on it. Do not open the bag because it will contaminate the scent and perhaps the DNA sample. Instruct the parents to place the bag in a safe spot where they can remember where it is. Keep it with a recent photograph.
. . . you should attend a CHIP program with the videos, fingerprints' and tons of EDUCATIONAL information when it is held in your community, a list of events can be found on the web at www.mychip.org. Hopefully, no one will ever need any of this. We will be perfectly happy if we waste the wafer and the bag. However, if it ever makes a difference, we would be very thankful.
Dr. Tesini is associate clinical professor at Tufts University School of Dental Medicine. He maintains a pediatric dentistry/ orthodontic practice in Natick. He patented Toothprints in 1986. Dr. Harte is founder and national spokesperson for the MasoniCHIP Program and a member of the Massachusetts Dental Identification Response Team. He maintains a practice in Milton.
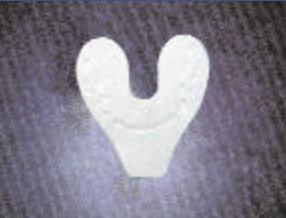
Toothprints® thermoplastic bite impression technique, like most procedures in clinical practice, is technique sensitive. The biometric information available from the thermoplastic wafer is directly proportional to the care with which the technique is performed, as well as the cooperation and understanding of the child. Although the amount of information and the detail we obtain with the impression of only a few teeth (tooth size and occlusal anatomy are able to be digitized to 50 microns), along with saliva for scent dog tracking and cellular DNA analysis, it is a properly taken full-arch bite impression that would provide the best opportunity for infinite concordant matches for identification, should the need arise (see Figure 1). With that in mind, below are the steps for properly taking a full-arch bite impression.
If possible, familiarize yourself with the thermoplastic material and overview of the entire bite impression technique prior to your participation in a sponsored CHIP event. Information on the technique and the material can be found on either www.kerrdental.com or www.mychip.org. Bring either latex or nitrile gloves, as those made from other materials may stick to the wafer. Make sure that the temperature on the wafer bath is preset to about 140°F. The Toothprints material should be just about ready to lump but not too putty-like or soft. Show the wafer to the child and explain the technique in terms the child can understand. Remember your Tell, Show, and Do from dental school? Can you open big, big like a lion? Good. And then close tight. Don't open until I tell you. I'll count to 10, okay? (Hint: Count slowly, until the wafer hardens.) Place the softened wafer centered over the lower arch. (If you're standing behind the child, with the child's head tipped back, it may be easier to position the wafer on the maxillary arch.) If the child is under the age of four, you may want to squeeze the wafer arches together or cut a few millimeters off of the back. Now, repeat the child-friendly explanation inStep 3. The wafer should be firm before removing. If the child bites and opens quickly, remove the wafer as fast as possible and hold it flat in your hand until it is firm. Wait 1-2 minutes for the water on the Toothprints wafer to dry, and then place it in the ziplock baggie and seal. It can be difficult to wait that 1-2 minutes when you have a line of 25 kids waiting, but it is important that the wafer be dry before it is packaged and sealed. If the child is uncooperative, place a nonsoftened Toothprints wafer in a ziplock bag, place the Bring to the Dentist sticker on the bag, and give it to the parent with instructions to bring it with the child to his or her next dental visit so his or her dentist can take the Toothprints impression at that time.
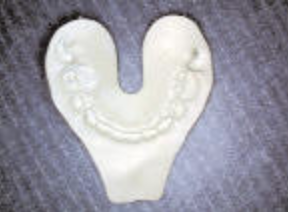 |
| Figure 1. Properly taken, detailed Toothprints bite impression showing full-arch dental characteristics. |
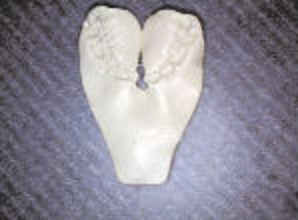 |
| Figure 2. Toothprints bite impression that has been poorly positioned, double bitten, and smudged. |
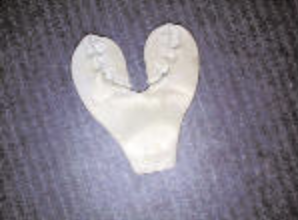 |
| Figure 3. Toothprints bite impression that has not captured the full dental arch. |
 |
| Figure 4. Thermoplastic wafer not heated sufficiently prior to placement. |
Toothprints bite impressions can aid in the recovery, identification, and prosecution for cases of lost, missing, or unidentified children. Therefore, it is crucial that the procedure be performed correctly to create a viable impression that will increase the chances of identification and tracking, and potentially, save lives.
Toothprints for Infant Identification to Biometric Infant Identification.